What are Virtual Environments and why you need one?
Virtual Environments provides an opportunity to run and test your code with different libraries and corresponding versions. It is an isolated “environment” like a sandbox for you to test different libraries. As an example, Data Scientists may be working with TensorFlow 1.x and would like to know whether the same code would work in TensorFlow 2.x.
First off, if you missed our previous article check out why we recommend Python. Having to write code from scratch every time is inefficient. Instead, the Python community has developed and shared a large library of code. In other words, instead of writing everything yourself, often times there are tried and tested libraries you can readily leverage. Building on top of each other, libraries and packages will have dependencies on other libraries as well. Subsequently during the installation process, dependent libraries are also installed and updated. Consequently, this poses an issue – What happens if installing one library, updates another dependent library and breaks my code? Unfortunately, this can happen and one reason for using Virtual Environments is to mitigate this risk.
Secondly, another reason to have Virtual Environments is to test your code with newer or different versions of libraries. However with each successive release of a package, functions could change, or even get deprecated. As a result, having a virtual environment with the latest libraries installed will allow you to test whether any adjustments are needed in your current code.
Let’s now go and setup a Virtual Environment, here we will describe two common approaches:
Anaconda – Virtual Environments
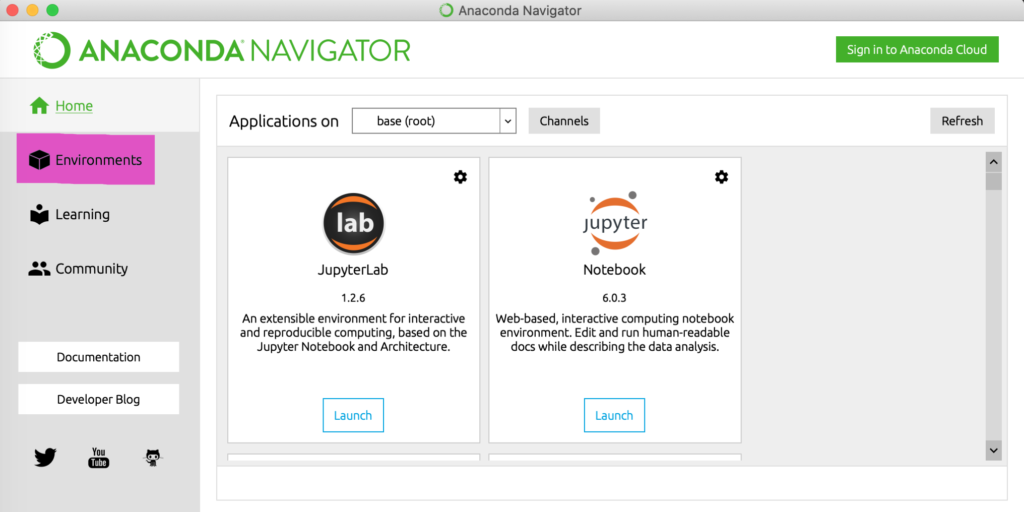
To begin with, start up Anaconda, on the left you should see an option “Environment”

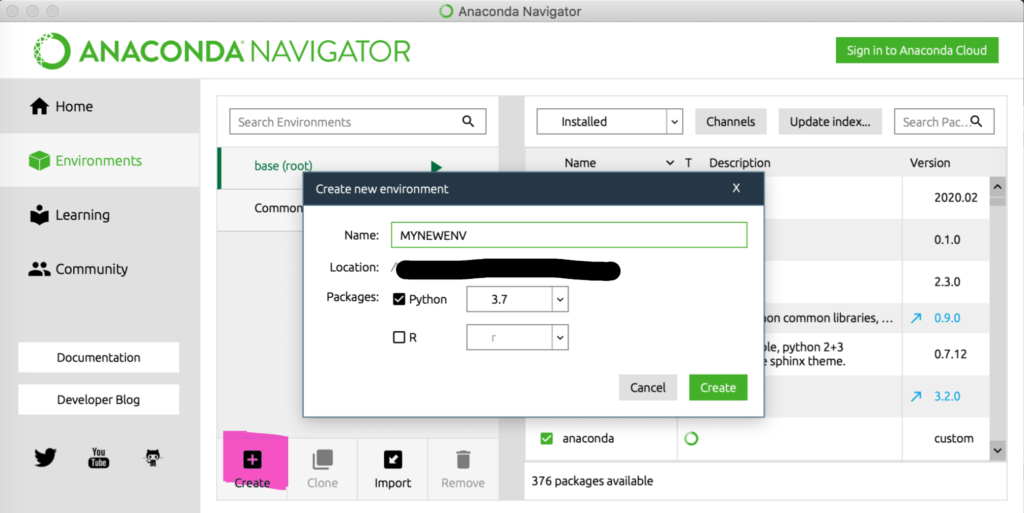
After selecting it, click on “Create”, enter a new name, select the Python version and click the green “Create” button.

For more details, check the documentation from Anaconda on how to setup environments
VENV – Virtual Environments
VENV is a library that comes with Python. By using the below command, you can easily verify if you have this installed.
% python3 -m venvAfter executing this, if you see instructions like below, then you have VENV already installed.
usage: venv [-h] [--system-site-packages] [--symlinks | --copies] [--clear]
            [--upgrade] [--without-pip] [--prompt PROMPT]
            ENV_DIR [ENV_DIR ...]
Now let’s proceed in creating our virtual environment:
% python3 -m venv MYNEWENVDoing this will create a new virtual environment called “MYNEWENV”, feel free to change the name to whatever you like. Afterwards, we can activate our newly created environment. Depending on which operating system you are running, the command may be different.
| Platform | Shell | Command to activate virtual environment |
|---|---|---|
| POSIX | bash/zsh | $ source <venv>/bin/activate |
| fish | $ source <venv>/bin/activate.fish | |
| csh/tcsh | $ source <venv>/bin/activate.csh | |
| PowerShell Core | $ <venv>/bin/Activate.ps1 | |
| Windows | cmd.exe | C:\> <venv>\Scripts\activate.bat |
| PowerShell | PS C:\> <venv>\Scripts\Activate.ps1 |
Often times, a simple command such as the below would suffice:
% source activate MYNEWENV
% conda activate MYNEWENV
Installing Packages
Once we have our virtual environment setup, we can quickly go over how you can install your favourite packages.
Anaconda
Installing and managing packages are rather simple and intuitive with the Anaconda Navigator.
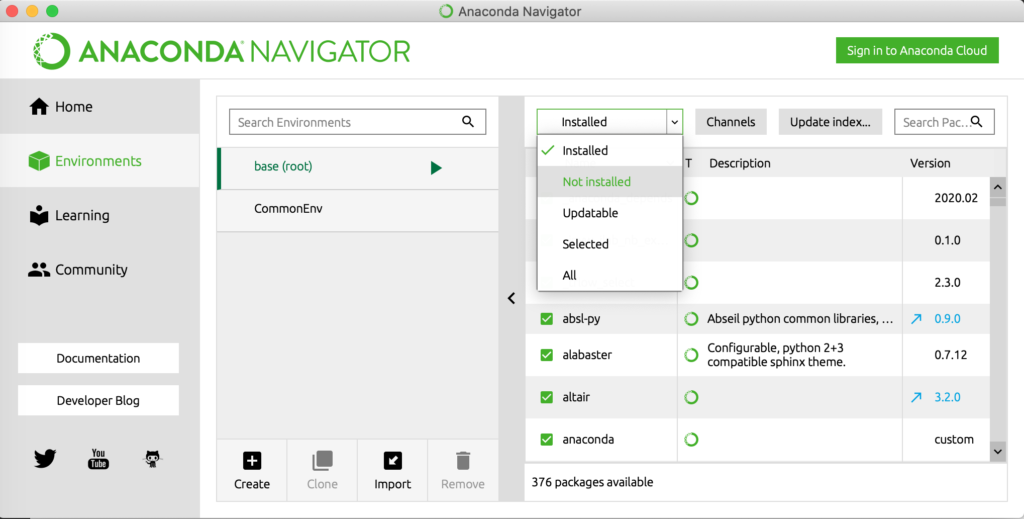
- Simply go to “Environments” on the left
- Select the Environment you would like to install the package to
- Select “Not Installed” from the pulldown
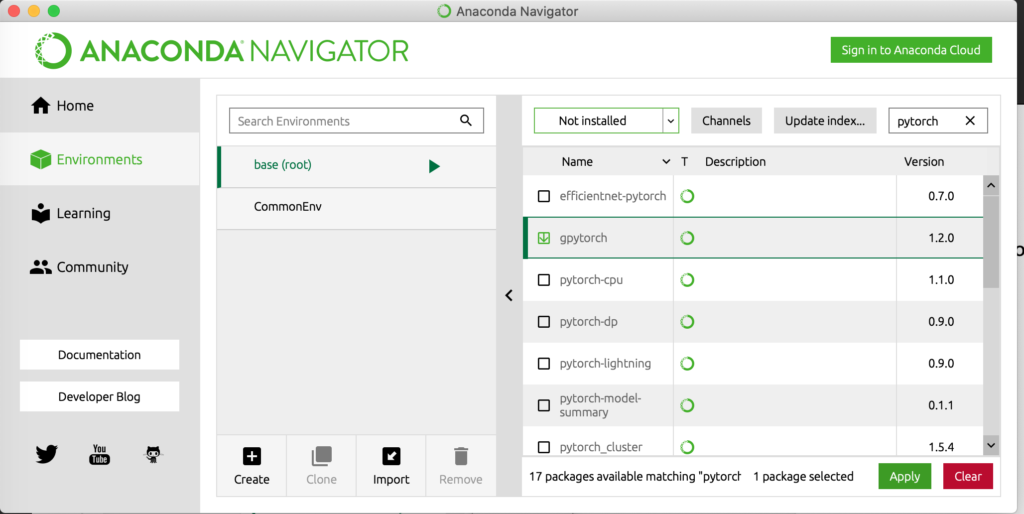
- Search for the package you would like to install

- Once you’ve found the package you are interested in, select it and click “Apply”

PIP
If you are comfortable working with the Command Line Interface (CLI), starting from python v3.4 a package management tool is already available called “PIP”. To install libraries with PIP:
- Start you Terminal (or CMD.exe)
- Activate the desired virtual environment you would like to install to (Skip this step if you want to use the system environment).
- In the command line, enter command such as: pip install <package>
% pip install tensorflowThat’s pretty much it, and if you are keen in installing a specific version, all you need to do is provide the version attribute.
% pip install tensorflow==2.1Hopefully the information shared above will assist you in getting started. Remember using virtual environments will allow you to isolate dependent libraries for development and testing and it is best not to work directly with the system environment.
 | About Alan Wong… Alan is a part time Digital enthusiast and full time innovator who believes in freedom for all via Digital Transformation. 兼職人工智能愛好者,全職企業家利用數碼科技釋放潛能與自由。 |
References:
Creating environments via Anaconda Navigator

