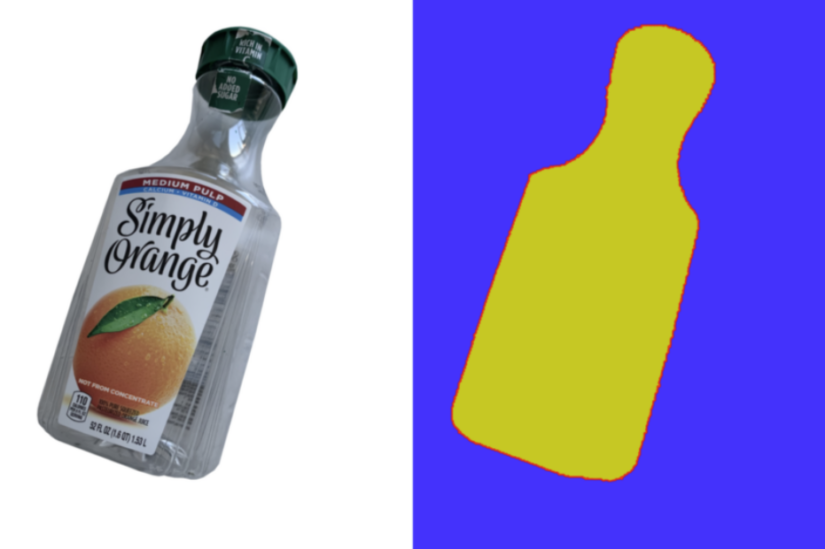
Welcome back to our series of articles on OpenCV and how we can leverage its power for image pre-processing. Building upon our previous articles, today we show you how to create a basic image segmentation map generator. Previously we looked at how to remove background from images. Subsequently we now use these clean images to generate an image mask. Specifically our image mask should help identify if each pixel:
- Part of the background (Assign value of 0)
- On the edge of the object of interest (Assign value of 1)
- Part of the object of object (Assign value of 2)
Different from Image classification, where we attempt to identify the type of object in an image; Image segmentation is the technique of identify where certain objects are in the image. Therefore, in order to train a machine learning model on image segmentation, we must prepare our dataset with our basic image segmentation map generator.
Basic Image Segmentation Map – Getting Started
At this point, we start by importing several basic libraries along with a helper function. The helper function helps display images in Jupyter notebook. If you are not using Jupyter notebooks, then skip the helper function.
import cv2
import numpy as np

#The line below is necessary to show Matplotlib's plots inside a Jupyter Notebook
%matplotlib inline

from matplotlib import pyplot as plt

#Use this helper function if you are working in Jupyter Lab
#If not, then directly use cv2.imshow(<window name>, <image>)

def showimage(myimage):
    if (myimage.ndim>2):  #This only applies to RGB or RGBA images (e.g. not to Black and White images)
        myimage = myimage[:,:,::-1] #OpenCV follows BGR order, while matplotlib likely follows RGB order

    fig, ax = plt.subplots(figsize=[10,10])
    ax.imshow(myimage, cmap = 'gray', interpolation = 'bicubic')
    plt.xticks([]), plt.yticks([])  # to hide tick values on X and Y axis
    plt.show()
Finally, we import a test image to guide you through our exercise.
# Read in our image
filename = "Test1"
myimage = cv2.imread(filename + ".JPG")

showimage(myimage)

Identifying our background color
In order to identify the color of our background, we will use the four corners method. Similar to chroma maps (or green screens), the background color has a high contrast to our object. Subsequently this allows easy removal. Unfortunately since we do not know which color this is, the four corners approach comes in handy. In summary, we sample the color of each corner and take its value as the background.
# We take the pixel value of the four corners to identify the background color
four_corners = np.array([
    myimage[0,0],
    myimage[0,myimage.shape[1]-1],
    myimage[myimage.shape[0]-1,0],
    myimage[myimage.shape[1]-1,myimage.shape[1]-1]
])

# Take average of each color channel [b,g,r] to obtain our background color.
# Here we also convert into 8 bit integer in order to get whole numbers
background_color = np.average(four_corners, axis=0).astype("uint8")
print(background_color)
[255 255 255]Building our initial image mask
Because we know the pixels that belong to our background, our next step is to use image thresholding to build our initial mask. In effect we want all background values as 0, and assign the value 2 (in this case) to our object.
#Apply Simple Thresholding based on background color

# We first determine the threshold. Since we have the background color (white), any pixel
# that matches this color would be the background. Hence we subtract one from this value
# during simple thresholding
threshold = np.average(background_color).astype("uint8")-1

# Since we are using THRESHOLD_BINARY_INV, it means if we find a value above
# the threshold (background), we assign it a 0. Values that are below the threshold are
# considered part of our object and assigned value = 2.
assignvalue = 2 # Part of our object

threshold_method = cv2.THRESH_BINARY_INV
_, image_mask = cv2.threshold(myimage_grey,threshold,assignvalue,threshold_method)

showimage(image_mask)

Basic Image Segmentation Map – Identifying the border with image contours
Once we have our image mask, identifying the pixels of the border becomes trivial. Particularly we have a clear outline of our object already. Whether we use edge detection & morphological transformation or image contours would meet our needs. Hence we opt for an image contour approach.
# Use RETR_EXTERNAL retrieval mode
contours, hierarchy = cv2.findContours(image_mask, cv2.RETR_EXTERNAL, 2)

# Here we assign all the contour/border values to 1
assign_edge_value = 1
image_mask = cv2.drawContours(image_mask, contours, -1, assign_edge_value,10)
showimage(image_mask)
At this point, our basic image segmentation map is complete (image_mask). Seeing that background=0, edge=1, and pixels containing our object=2, it is difficult to view with the naked eye. Therefore for illustration purposes, we draw a colored version.
# Make a copy of our image_mask in BGR space
image_map = np.zeros((image_mask.shape[0],image_mask[1],image_mask[2]),dtype="uint8")

# Color our values for ease of viewing
image_map[np.where(output==0)]=(255,50,50). # Background is blue
image_map[np.where(output==1)]=(0,0,255). # Border is red
image_map[np.where(output==2)]=(0,200,200) # Object is yellow

showimage(image_map)

Combining all our code together, here is the function to take an image and return an image segmentation map.
def segmap(myimage, edgevalue = 1, objectvalue=2):

    # We take the pixel value of the four corners to identify the background color
    four_corners = np.array([
        myimage[0,0],
        myimage[0,myimage.shape[1]-1],
        myimage[myimage.shape[0]-1,0],
        myimage[myimage.shape[1]-1,myimage.shape[1]-1]
    ])

    # Take average of each color channel [b,g,r] to obtain our background color.
    # Here we also convert into 8 bit integer in order to get whole numbers
    background_color = np.average(four_corners, axis=0).astype("uint8")

    # Convert image to greyscale
    myimage_grey = cv2.cvtColor(myimage,cv2.COLOR_BGR2GRAY)

    #Apply Simple Thresholding based on background color
    threshold = np.average(background_color).astype("uint8")-1

    # Assign pixels of our object based on objectvalue. Default is 2
    assignvalue = objectvalue # Part of our object

    # Background pixels will have value 0
    threshold_method = cv2.THRESH_BINARY_INV
    _, image_mask = cv2.threshold(myimage_grey,threshold,assignvalue,threshold_method)

    # Use RETR_EXTERNAL retrieval mode
    contours, hierarchy = cv2.findContours(image_mask, cv2.RETR_EXTERNAL, 2)

    # Here we assign all the contour/border values to edgevalue. Default is 1
    assign_edge_value = edgevalue
    image_mask = cv2.drawContours(image_mask, contours, -1, assign_edge_value,10)

    # Result the image mask as our output
    return image_mask


